

Version 1.3
2.7 Access Restrictions to See-Fi Peers
1.1 About See-Fi
See-Fi helps you to share your mobile phone calendar with designated contacts (customers, business affiliates, partners, family, friends etc.) You can instantly lookup schedule availability of multiple people across businesses, make appointments, and coordinate schedules in real-time without back and forth emails/calls, and without forcing anyone to upload calendar to any server. By leveraging the ubiquity of text messaging, See-Fi enables direct phone-to-phone calendar sharing among designated contacts even if they are not connected to a common server and even if they have different mobile phones.
See-Fi is a ‘pure’ peer-to-peer app and it does not connect to any server nor upload any data to any website. Data generated by See-Fi is stored locally on the phone. See-Fi helps users to share their mobile phone calendar with people whom they care the most - family, friends, customers, colleagues, business affiliates and so on.
All participating members should have See-Fi installed on their phones. Whenever you add a contact with whom you would like to share your mobile phone calendar, See-Fi automatically detects whether the designated contact has See-Fi installed on his/her phone. Your contact will receive an invitation text message to install See-Fi on his/her phone.
NOTE: Please be aware that by using See-Fi you will be exposing your mobile phone calendar to your designated contacts and you will be allowing them to access and/or modify your mobile phone calendar. See-Fi sends and receives text messages. Standard text messaging charges apply. Please check with your carrier.
1.2 Compatible Handsets
See-Fi is a Java application and works on MIDP 2.0 CLDC 1.1 mobile phones. Currently See-Fi is compatible with most Java enabled phones supporting JSR 75 (PIM APIs) and JSR 120 (WMA 1.1 APIs). At the time of printing See-Fi is compatible with the following mobile phones:
- Nokia Series 60 3rd Edition and higher (http://forum.nokia.com)
- Nokia Series 40 3rd Edition and higher (http://forum.nokia.com)
- Sony Ericsson JP-7, JP-8 and higher
- Motorola phones (http://developer.motorola.com/products/handsets/?filters=204,2&num=all)
- Samsung phones supporting JSR 75 and JSR 120
- LG phones supporting JSR 75 and JSR 120
- BlackBerry smartphones with BlackBerry OS 4.5 or higher
NOTE: The appearance of screen shots shown in this document may differ depending on your mobile phone.
The following sections will help you to setup and start using See-Fi.
2.1 See-Fi Setup
- Download the Java file (jar or jad) to your phone and launch the Java file. You can install See-Fi on phone memory or external memory card. To ensure best possible performance, install See-Fi on phone memory.
- See-Fi
is installed in ‘Applications’ folder by default (may vary depending on
your phone model). Go to ‘Applications’ folder and launch See-Fi
application (
 icon).
- See-Fi End User License Agreement screen is displayed. Read this legal agreement and if you accept the agreement, click ‘Accept’ to proceed.
- ‘See-Fi Setup’ screen is displayed. Click ‘OK’. Click ‘OK’ or ‘Yes’ to the prompts displayed after the initial Setup screen. If you click ‘No’ to any of the prompts, installation will fail and you have to restart the installation process.
- Enter your name on the Setup screen which displays ‘Enter Your Name’ and click ‘OK’.
- See-Fi splash screen is displayed and then ‘See-Fi Home’ screen is displayed as following:

Figure 1 – See-Fi Home
2.2 Adding See-Fi Peers
See-Fi helps to mutually share your mobile calendar with designated contacts. These ‘designated contacts’ are your See-Fi Peers with whom you will be mutually sharing your mobile phone calendar. See-Fi Peers is similar to ‘Buddy Lists’ in Instant Messaging applications. This section describes the steps involved to create a See-Fi Peer.
- From ‘See-Fi Home’ screen, scroll to ‘See-Fi Peers’ and select ‘Open’ from the menu. ‘My See-Fi Peers’ screen is displayed as following:
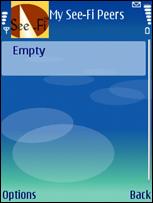
Figure 2 – My See-Fi Peers
- From ‘My See-Fi Peers’ screen, select ‘New Peer’ from the menu. ‘New See-Fi Peer’ screen is displayed as following:
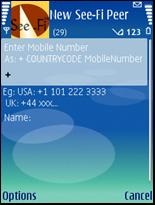
Figure 3 – New See-Fi Peer
- On ‘New See-Fi Peer’ screen, enter the phone number of your contact in international format and the name of your contact. NOTE: All phone numbers should be entered in international format with a ‘+’ sign preceding the number. For example: In the US: +1 101 555 9909, in the UK: +44 xxx..., in Finland: +358 yyy..., in Sweden: +46 abcd...
- Select ‘Save & Invite’ from the menu. Two text messages are sent to your contact. If applicable, select ‘Yes’ to text messaging prompts – one text message is delivered to your contact’s inbox. Whenever you invite a See-Fi Peer, before adding the contact to See-Fi Peer list, the application will automatically check whether your contact has See-Fi installed on his/her phone. If See-Fi is installed on your Peer’s phone, See-Fi will acknowledge the invitation and the Peer status on your phone will change to ‘confirmed’. Until then, the Peer Status on your phone will remain ‘Unconfirmed’. ‘My See-Fi Peers’ screen is displayed as following with ‘Not Confirmed’ displayed next to the name:
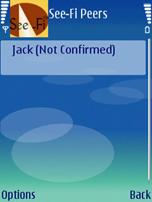
Figure 4 – My See-Fi Peers with an Unconfirmed Peer
- Wait for 1-2 minutes so that the application can receive a confirmation from your contact’s phone. If See-Fi is installed on your Peer’s phone, the application will receive a confirmation and ‘My See-Fi Peers’ screen is refreshed. NOTE: In the following screen, notice that ‘Not Confirmed’ is no longer displayed next to the name of the See-Fi Peer.
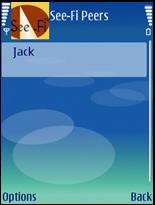
Figure 5 – My See-Fi Peers with a Confirmed Peer
NOTE: If See-Fi is not installed on your Peer’s phone, the Peer status will remain ‘Unconfirmed’. You can ask your contact to install See-Fi. You can resend the invitation from ‘My See-Fi Peers’ screen. Select ‘Invite Now’ from the menu for resending the invitation.
2.3 Check Schedules
Using See-Fi you can simultaneously check schedules of multiple See-Fi Peers. You cannot check schedules of ‘unconfirmed’ peers. When you check schedules of See-Fi Peers, you can check for their availability in any given time frame on a particular date. For privacy reasons, you cannot access any other schedule details.
1. On ‘See-Fi Home’, scroll to ‘Check Schedules’ and select ‘Open’ from the menu. ‘Schedule Check’ screen is displayed as following:
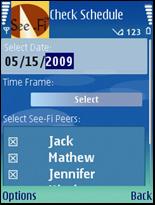
Figure 6 – Schedule Check
2. Select a date, select ‘Time Frame’ and under ‘Select See-Fi Peers’ select the people whose schedule you would like to check. You can select multiple peers at a time. Select ‘Check’ from the menu. If applicable, select ‘Yes’ to message prompt(s) for sending text messages. ‘Schedule Results’ page is displayed with your schedule availability information at the top and waiting for peers’ schedule information to arrive:
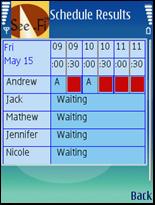
Figure 7 – ‘Waiting’ for schedule results to arrive
3. Within a short time (typically in less than a minute depending upon your network), you will get the results from your peers. ‘Schedule Results’ screen will be refreshed as following:
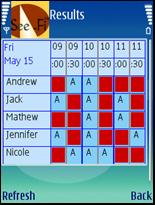
Figure 8 – Schedule Results
The table is shown in half hour blocks. For example, if a peer is available at 10:00, then it will be displayed as ‘A’ in the cell corresponding to that peer. Otherwise, a red block is displayed in the cell to indicate non-availability.
2.4 Schedule Meeting
Using See-Fi you can schedule meetings with See-Fi Peers.
- On ‘See-Fi Home’ scroll to ‘Schedule Meeting’ and select ‘Open’ from the menu. ‘Schedule Meeting’ screen is displayed as following:

Figure 9 – Schedule Meeting
- Select a meeting date and time under ‘Select Date and Time’, enter meeting ‘Duration’ in minutes, enter meeting ‘Subject’, enter meeting ‘Location’ and select meeting participants under ‘Select Attendees’. Select ‘Send’ from the menu.
- Confirmation box is displayed. Select ‘OK’ to confirmation. If applicable, select ‘Yes’ to ‘Update Meetings’ prompt. If applicable, select ‘Yes’ to the message prompt(s) for sending text messages.
- Meeting will be scheduled in the calendar on your phone, and meeting request is sent to selected attendees.
- Based on See-Fi settings, See-Fi will cause the phone to vibrate whenever a See-Fi Peer schedules a meeting on your phone.
2.5 Activity Log
Activity Log maintains a history of all outgoing and incoming requests to See-Fi on your phone. This is similar to mobile phone Call Log. For outgoing requests you can see the type of request (check schedule or meeting request) and a brief description. For incoming requests you can see the sender's name and a brief description.
- On ‘See-Fi Home’ screen, scroll down to ‘Activity Log’ and select ‘Open’ from the menu. ‘Activity Log’ screen is displayed as following:
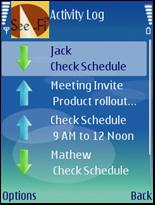
Figure 10 – Activity Log
- To view details of the log, scroll down to an item and select ‘Open’ from the menu. Details are displayed as following.
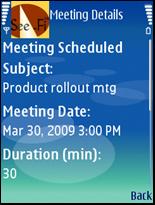
Figure 11 – Activity Log Details
NOTE: In this instance ‘Meeting Details’ are displayed.
- To delete a log item, on ‘Activity Log’ screen, scroll down to an item, and select 'Delete' from the menu.
- To delete all items, select 'Clear Log' from the menu.
2.6 See-Fi Settings
The phone vibrates whenever a See-Fi Peer schedules meetings with others and whenever a See-Fi Peer does a schedule search.
These vibration settings can be modified from ‘Settings’ menu. On ‘See-Fi Home’ screen, scroll down to ‘Settings’ and select ‘Open’ from the menu. Settings screen is displayed as following:

Figure 12 – Settings Screen
- To edit Settings, select ‘Edit’ from the menu. ‘Edit Settings’ screen is displayed as following:
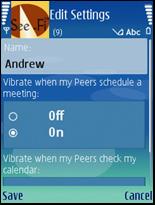
Figure 13 – Edit Settings
- You can edit the name. NOTE: The name displayed here will be used during peer-to-peer requests.
- Select ‘Off’ radio button under ‘Vibrate when my Peers schedule a meeting’
- Select ‘Off’ radio button under ‘Vibrate when my Peers check my calendar’
- Click on ‘Save’ and the following screen is displayed:
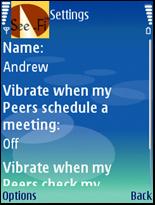
Figure 14 – Settings screen with vibration ‘Off’
- With this setting, your phone will not vibrate when your See-Fi Peers send a schedule search or schedule meeting request to you.
2.7 Access Restrictions to See-Fi Peers
You can control access to your mobile phone calendar by blocking calendar access to a See-Fi Peer. A ‘Blocked’ See-Fi Peer cannot access your mobile phone calendar. Whenever a blocked Peer sends a schedule check request, the application automatically sends 'Busy' for the requested time frame. A ‘Blocked’ See-Fi Peer will not know that you have blocked them from accessing your calendar. A ‘Blocked’ See-Fi Peer cannot schedule meetings in your mobile phone calendar. However, all such requests will be logged in the ‘Activity Log’. If you have blocked any See-Fi Peers, we encourage you to frequently visit the ‘Activity Log’ and ‘Log Details’, so that you do not miss important meetings/events sent by ‘Blocked’ See-Fi Peers.
- To block a See-Fi Peer, on ‘My See-Fi Peers’, scroll down to a See-Fi Peer and select 'Block/Unblock' from the menu. The Peer will be blocked from accessing your mobile phone calendar. ‘My See-Fi Peers’ screen is displayed as following:
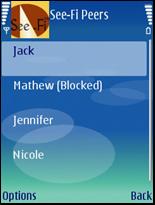
Figure 15 – My See-Fi Peers with a Blocked Peer
- To Unblock a blocked ‘See-Fi Peer’, from ‘My See-Fi Peers’ screen, select ‘Block/Unblock’ from the menu.
2.8 Editing See-Fi Peer Info
You can edit See-Fi Peer info from Edit See-Fi Peer screen. When you are on the edit screen, you can edit the name and the security status. You cannot edit the mobile phone number of a See-Fi Peer. If you have incorrectly entered the mobile number, delete the See-Fi Peer and create a new entry.
- On ‘My See-Fi Peers’ screen, scroll down to a See-Fi Peer, and select ‘Edit’ from the menu. ‘Edit See-Fi Peer’ screen is displayed as following:

Figure 16 – Edit See-Fi Peer
- Edit your changes and click ‘Save’ from the menu to save your changes.
2.9 Deleting a See-Fi Peer
When you delete a ‘confirmed’ See-Fi Peer, it will be deleted on your phone and a delete request will be sent to your See-Fi Peer. Since See-Fi enables mutual sharing of mobile phone calendar, whenever you delete a See-Fi Peer, the application sends a delete request to your Peer’s phone and your information on your Peer’s phone will be deleted as well. All delete requests are logged in ‘Activity Log’.
When you delete an ‘unconfirmed’ See-Fi Peer it will be deleted on your phone. No delete requests will be sent to the See-Fi Peer.
- To delete a See-Fi Peer, on ‘My See-Fi Peers’ screen, scroll down to a See-Fi Peer and select ‘Delete’ from the menu.
- A delete confirmation message is displayed. Select your choice. If it is a confirmed link, a text message is sent to the See-Fi Peer. If applicable, select ‘Yes’ to send text message prompt.
2.10 Uninstalling See-Fi
To uninstall See-Fi follow these steps:
- Navigate to folder where See-Fi is installed and select See-Fi icon.
- Select ‘Remove’ or ‘Delete’ from the menu.
If See-Fi is running in the background, a warning is displayed: “Warning: Unable to remove See-Fi. Some applications must be closed first.” If applicable, select ‘Continue’ to close See-Fi automatically and continue the uninstall process. If you encounter any issues, shut down your phone and uninstall after turning the phone on.
2.11 Support
When you are running See-Fi, you can access application Help from most of the screens. Wherever applicable, select ‘Help’ from the menu to view context-sensitive help. This will be your primary source of information that you can access at any time. If you need more details, please visit our online support at http://www.mSeer.com/support.html where you can find a variety of information. If the problem/issue still exists, please email us at support@mSeer.com with all the details such as the description of the problem, device model, network/carrier that you were using when the problem occurred, and any other related information.